Sunday, January 30, 2011

Oeuf En Cocotte

I was playing around on the web looking at old PBS videos and came across a very cool technique. It was featured on an episode of "The French Chef" with Julia Child. The dish is called oeuf en cocotte. The word "oeuf" of course is French for "egg", but I had to look up the word "cocotte" in the French dictionary to satisfy my curiosity. Here is what I found:

Definitions of cocotte on the Web:

• prostitute: a woman who engages in sexual intercourse for money
• a small casserole in which individual portions can be cooked and serve

I assume the second definition is what I was looking for. It is an egg along with various ingredients all cooked in a ramekin. The method is to cook the ramekin in a bain-marie. I received a nice set of Le Creuset mini-ramekins for Christmas that I have been itching to use. Here was my opportunity. There is something elegant and sensous about cooking food and serving it in the same individual dish. 


Last night, I had a guest over for dinner  who arrived too hungry to be able to wait for dinner, so I made the above pictured oeuf en cocotte as an impromptu appetizer while I cooked our dinner. Here's how I made it:

Ingredients for 1 serving:

-1 egg
-some butter
-2 mushrooms, finely chopped
-1 TBS Creme fraiche
-1 TBS grated cheese such a parmesan
-1 tsp chives, finely chopped
-1 tsp parsley, finely chopped
-salt & pepper

Direction:
-Preheat oven to 350
-boil enough water to fill an oven proof pan 1/2 way up the side of the ramekin
-In a saute pan, saute mushrooms in some butter. Season 

with salt and pepper. Sprinkle with chopped parsley. Set 
aside.
-fill the bain-marie pan with the boiling water
-butter the inside of a ramekin
-place sauteed mushrooms in the ramekin
-add the creme fraiche
-place ramekin in the pan
-allow a few minutes for the ramekin to warm
-break the egg in to the ramekin
-top with a sliver of butter
-season with salt & pepper
-add grated cheese
-place in oven and heat until the egg white sets and the yolk is the way you like it. You'll know by jiggling the pan. This should take 10-15 minutes.
-remove the ramekin with some tongs and allow to cool for a few minutes
-add the chives as garnish and serve.


This recipe can be varied in many ways with your imagination as the limit. You can use ham instead of the mushrooms, or sauteed vegetables, or salmon. The herbs can be whatever you prefer like basil, tarragon, or chervil. The cheese can be changed from parmesan to gruyere. You get the point. The choices are almost infinite because eggs are compatible with so many ingredients. It's an extremely simple and versatile method of presenting an egg that elevates it from the the every day pedestrian egg on a plate.

Wednesday, January 26, 2011

Food - The Ultimate Equalizer

I am in Miami for the day with my airline job. I am always in search of good food here and I am most often disappointed, not because of Miami, but because my layover location is not the best in Miami. It's not the trendy South Beach, nor is it Coral Gables, or Coconut Grove. I am staying near the Miami airport where my choices of decent dining are very limited. There are lots of strip mall style stores, cafes, and nondescript restaurants- all of them latin. Cuban food is king here. On this rather gloomy FL day, I went out for lunch and explored some of the less trodden, rather shady looking streets and came across a very authentic Cuban place, not very originally named "Havana Cafe.". This place was the real deal with the walk-up espresso window and not much evidence of the English language to be found inside. It was a local's hangout. I went in despite the not-too-friendly glares.

I lived in FL for many years. There has always been a divisive prejudice between the Cubans and the non-Cubans. Don't ask me who is at fault. I don't know. Today I felt that prejudicial eye as I sat at the bar and prepared to order. I was generally ignored, my order was taken without a smile, and all of my English was met with replies in Spanish. I ordered a Cuban Steak sandwich which was priced at an incredible $4.50! I could have actually been in Cuba with these low prices. My cafe Con leche came first. I have to admit, the Cubans have a great coffee ritual. As I drank the coffee, the cuban music filling the air, I remembered a passage in Julia Child's book "My Life in France" where she was annoyed with Americans who found things to complain about the French culture rather than embracing all of the wonderful qualities of the French. Maybe I can do the same here. My heartbeat slowed almost immediately at the thought and my anxiety level came down a notch.

My steak sandwich came. A very humble looking sandwich on a white bun in a plastic basket. With low expectations, I took a bite and was really rocked by how good it was. There was some sort of rub/marinade on the meat that gave it a great "tangy" flavor. Hmmmm. "This is pretty good" I though to myself.  After finishing my meal, I told the waitress that the steak was really good and asked if she knew how the meat was prepared. It was as if I had found the key to unlock the barrier between us. She smiled and responded in English that she would find out. She went into the kitchen and returned with the cook (an older Cuban woman) in tow. The Cook proudly explained, through translation by the waitress, how she made the marinade/rub. Truthfully, I didn't fully understand all that she said. I was too caught up in suddenly becoming an "insider". The graciousness didn't stop there. When presented with the bill for a whopping $5.45, I was told that I could not use my credit card unless I had a $10 minimum. Having no cash on me, I offered a tip of $4.55 to bring the total to $10. She refused and wanted to give me the meal for free! After a few back-and-forths, I finally won and paid the $10. I had gone from being a lowly non-Cuban stranger to being offered a free meal in a mere 30 minutes.

There are so many lessons to be learned here that I don't know where to begin. I'll just keep it relevant to this blog. Food.....We all need it. We all go about making it differently. Each culture celebrates their food differently.  Yet, in the end, it's the one thing that all humans have in common that can bring us together - our love for food. Food is the ultimate equalizer.

Friday, January 21, 2011

Duck Proscuitto

I have been fascinated with the idea of curing meat. Long before refrigeration, this is how people stored meat. A little research revealed that curing meats has been around since the "ancient times". The are several forms of curing, but dry curing with salt is one of the simplest. I have always been a little intrigued by things of the past, so I decided to apply this old techniques to the duck breast and make some Duck Prosciutto. There is a lot of info on curing duck breast on the internet since it was popularized by Michael Ruhlman's book "Charcuterie" (which I have not read.)

WARNING! This is a method that I used without any prior experience. I am not an expert in curing and am not suggesting that you follow my recipe. I am just sharing information. Proceed at your own risk!


I bought a magret duck breast for this project. Magret is the breast of a moulard duck which has been fattened for the production of foie gras. It is known for its rich flavor. I rinsed the breast and dried it. I then made a mix of kosher salt and sugar (80% salt/20% sugar) enough to cover the breast in a non-reactive container. The goal is to pack the breast completely with the mixture. The purpose of the salt is to draw out all of the moisture which will in turn slow the production of harmful bacteria. The sugar adds flavor and counters the hardening effect of the salt. There are various flavors that can be introduced with the addition of herbs. In this case, I didn't use any. I then covered and placed in the fridge for 2 days. This allows time for the salt to do it's job.

Next, I removed the breast from the fridge, thoroughly rinsed the salt/sugar off the breast and then dried it with paper towels. Next, using cheese cloth, I wrapped the breast and tied it with kitchen string in a fashion that would allow me to hang it.

Temperature and humidity are critical: The ideal temperature for curing meat is 36-40 degrees F. Below 36, the process slows down too much and the longer process causes excess loss in the flavor. And, above 50 degrees, spoilage occurs. The level of humidity is also important to allow for the evaporation of moisture to occur. I wanted to cure the meat in my garage. Winter temperatures and humidity levels (in California) are ideal for curing. Otherwise, curing can be done in a fridge.

Weight: After wrapping the breast in the cheese cloth, I weighed it. This is important because the cure is complete when the breast has lost approximately 30% of its weight. In my case, the weight was 404 grams. So, my target weight for completion was  282 grams. (In researching the weight reduction goal, I came across numbers ranging from 20% to 30%, so I chose to go with the most conservative number which was 30%)


I hung the breast in my garage mid December and it took over a month for it to reach the target weight. I checked and recorded the weight weekly to monitor the progress of the cure. Initially, the weight dropped quickly during the first week. It then slowed to a few grams per week. The weight loss essentially stopped before hitting my target. It had only lost about 20% of its weight. I made the command decision to stop the process at this point even though it had not reached the 30% target. This morning, nervous with anticipation, I brought it down and opened it. The color was actually not very appealing. It was a dark brown color. I cut it open and was happy to see a beautiful red color on the inside. I took a bite. The fat melted in my mouth and the meat had the perfect balance of texture, game, flavor, and salt. WOW! It worked, although I still have to wait to see if I will die from botulism.

I cut the breast into 5 equal portions, bagged, tagged, and placed in the freezer. I have lots of ideas for how I will use it. I may even cook some of it and use it on pizza, or as garnish for soup or salad.

I recommend that you read and research this process rather than following my curing technique. There is a lot of technical chemistry and MANY finer points involved in this process that I have ignored. I decided to not to get too bogged down with science and just do what people may have done years ago. 

Tuesday, January 18, 2011

La Fonda Del Sol, NYC

A wintry, drizzly day in NY led me to seek quick shelter for lunch. Walking rapidly and trying to peer below the rim of my umbrella through the drizzle, I spotted a trendy looking sit-down restaurant. No time to be picky, I ducked inside and asked for a table. I was at La Fonda Del Sol in Midtown Manhattan. Pure chance had led me to this cool Spanish tapas restaurant on the ground floor of the MetLife Building at 44th and Vanderbilt. The menu looked interesting. It was divided into seafood, meats, cheese, and vegetable. The average price ranged from $9-$15 per serving. So I decided to order the tuna belly with Navy beans, herbs, and jalapeno tossed in an oil and vinegar, the short rib with pomegranate seeds and sweet pickled cipollini onions, and the Tuna tacos with avocado, jalapeno pickled onions.

As I waited for the food, I read some yelp reviews on my iphone. The overall rating was 3 1/2 stars. Most of the complaints were about the octopus dish being rubbery and bland, poor service with lots of orders being mixed up, and steep prices for the small serving size.


Tuna Belly, Navy beans, jalapeno oil & vinegar


Short Rib, pomegranate, sweet cipollini onions


Tuna Tacos, avocados, jalapeno, lemon/lime juice

All in all, it was a great meal. The tuna belly dish was a little too oily and the tuna could have been canned white tuna, but the overall flavor was decent. The short rib was excellent. It was tender and juicy. The tuna taco was also delicious. The tuna was sushi grade and went well with the jalapeno, onions and the lemon/lime juice that was drizzled on it. My service was excellent. Grant it, it was a very quiet lunch so I had the server all to myself. I do think that the prices are fairly steep, but it's NYC! Everything is expensive. I left feeling satisfied. I would come back again.


Sunday, January 16, 2011

Frycook?

This is my 100th post on this blog. I would have preferred to write about something a little more exciting than frying rice balls. Did I pay all that money for Culinary school only to end up as a frycook deep frying rice balls all day? Let me back up.

I got a call from the winery chef to work a food and wine event for the weekend. I am always excited for winery jobs since each one is different. The Chef emailed me a detailed summary of the menu, my tasks, and logistics. Another chef and I would be working the event. The "menu" was really only one item - arancini. Arancini is a rice ball which is made with risotto and various other ingredients. The flavors in the arancini were designed to pair nicely with the winery's pinots and merlot. For this event, the Chef and his assistants had spent the week making 4000 heirloom pumpkin and braised short rib arancinis. Our job was to deep fry them and serve them individually and unceremoniously on a paper napkin at the winery. So much for improving my culinary skills with cutting edge techniques. A 16 year old kid at McDonalds could do this one.

It would have been nice to have been a part of the assemblage of the arancini. It's actually a nice little process. Basically, make risotto and place on a sheet tray to cool in fridge. Bake pumpkin and puree. Cool. Braise the short ribs in veal stock and wine. Shred or chop the meat. Fold the pumpkin puree and short ribs into the risotto. Roll individual balls. dip each ball into flour, eggs, and bread crumbs. Then deep fry. Viola! I mean Presto!

Maybe there is a significance in this blog entry after all. There is a lesson to be learned from any experience no matter how trivial. Frying something all day long, although boring, taught me to recognize the exact color and feel of the end product. I experienced some things that are impossible to "see" without doing a task all day long. I played little games with trying to do each batch just a little faster. I tried to be more efficient with my movements. I tried to make the next batch even better. These games kept me engaged and interested allowing me to survive the day. Perhaps the biggest lesson learned is that professional cooking for the most part is unglamorous and very repetitious. It's through this repetition that cooks become so good at what they do. Whether It's cooking rice balls or a high end product such as foie gras or lobster. The learning process is the same. Plus, how can I possibly complain about a job where I am offered an occasional taste of wine while I cook. Not a bad gig!

Thursday, January 6, 2011

Making Sausage at home

I have been wanting to make sausage at home for some time now so I placed a request to Santa for a KitchenAid meat grinder attachment and a sausage stuffer. Having done some research online for techniques and recipes I decided to give it a try today. I set aside the entire day to do this as I had read about some areas that might cause problems. Here are some of the facts I learned after my research.


My KitchenAid grinder, plastic pusher, and sausage nozzles

Equipment:
-a grinder with a coarse die
-sausage stuffer (larger nozzle)
-Larger tray for the grinder was an addition. It makes the task easier than the small tray that comes attached to the grinder

Ingredients:
-Pork with fat content of approximately 20% or leaner meat with addition of pork fat
-a variety of spices
-sausage casing either synthetic or natural. Natural is the best. Usually hog casings made of intestines are considered the best and used by your local butcher (even at the the chain store meat department). Just ask your local butcher and he can get it for you, or you can order it online.

Concerns:
-The kitchen aid grinder works well enough but the weakness is with the plastic pusher used to feed the meat into the grinder. KitchenAid previously supplied a wooden pusher which was much more effective but discontinued it probably because it's more expensive to produce. In fact, most of the online KitchenAid grinder ads still display the grinder with the wooden pusher. The problem with the plastic pusher seems to be inadvertent introduction of air into the grinder.
-The KA sausage stuffer nozzle gets very bad reviews. The problem seems to be that it heats up which causes the meat/fat to also heat up. It's inexpensive so I thought I would give it a try. I don't foresee becoming a serious sausage maker so I didn't want to invest a couple of hundred bucks on a nicer stuffer.
-Everything I read indicates that the equipment and the ingredients must be kept cold at all times or the process fails. This is mainly to keep the meat cold to prevent the formation of harmful bacteria. Additionally, as the fat warms, it become more difficult to run through the grinder during both the meat grinding and the stuffing.

Armed with the above information, I decided to make a spicy Italian sausage. My local butcher recommended pork shoulder for its correct proportion of meat to fat. He did say that some people preferred more fat, but he likes the shoulder and uses it for the store's sausages. I decided to buy a quantity that would allow me to process everything in a manageable size. 5 Lbs. seemed like an ideal quantity for my Kitchen aid mixing bowl. Most recipes I came across seem to add about 1Lb of fat to 5 Lbs of shoulder, but I decided to go with my butcher's recommendation of not adding the fat.


5 Lb. Pork Shoulder ($10.50)


I began by cutting the meat into bite sized pieces. This facilitates the grinding process. I then placed the grinder, attachments, and the meat in the fridge for about 1 hour before starting. while waiting, I assembled the spices. There are no rules here, only your own taste preference dictates the herbs that you choose. The only rule is that some sort of liquid needs to be used to bind everything. 1 cup of liquid is appropriate for 5 Lbs. of meat. Here is what I used:

4 TBS ground red pepper flakes
4 TBS Oregano
4 TBS toasted fennel ground
2 TBS onions finely chopped
1 TBS sugar
2 tsp paprika
2 tsp ground coriander seed
salt and pepper to your liking

1/4 cup red wine vinegar
3/4 cup red wine


Herbs and the vinegar

I combined all of the spices along with the liquids in a bowl and placed it in the fridge to keep cold.

Next, I retrieved the equipment and the meat from the fridge and began grinding. I recommend using speed 4 on the mixer and don't rush the process. The plastic pusher seemed to work fine as long as I didn't try to force the process too much. The entire grinding took about 20 minutes.


The plastic pusher and grinder in action


The Ground meat

When I finished the grinding, I placed the meat back in the fridge while I disassembled and cleaned the grinder. I noticed that some sinew had been caught in the blade and the die which explains why the mixer seemed to bog down at times. The next time I do this, I'll stop in the middle of grinding and clean them a couple of times to help speed up the process.

The next step is combining the spices with the meat. To aid in doing this I set up the mixer with the dough hook and used speed 4 and 6 to mix. You only want to do this until the meat and spices are well mixed as evidenced by clumping.


Using the dough hook to mix the spices with the
ground meat


The pork is ready to be cased

The pork is now ready to be cased. During my research I came across an excellent suggestion by an author to take a little of the pork and make a hamburger  to test for proper seasoning. This way, you can make adjustments before casing it.


Testing the seasoning by making a burger

These days I seem to use every opportunity to practice plating. This being no exception, I decided to plate  it with a ring molded fried egg, some pickled red onion slices that I made last week, and my wine- pomegranate reduction sauce. I think I have been watching too much Top Chef!


decided to have fun with my test burger

Making a test burger turned out to be a good idea because my mix needed more salt and more "heat." I decided to add some tabasco.

It was time to bring it all together. I opened the package of casings that my butcher gave me. Not knowing what to expect, I was pleasantly surprised to see that the casing had been threaded onto a plastic "tube" which made it a cinch to slide onto the sausage stuffer.


The hog intestines as they came from the
 butcher, pre-cleaned
 and threaded on a plastic tube ($5.00)


I placed the plastic tube on the stuffer and the
 casing easily slid off onto the nozzle


Yeah, yeah....I know what you're thinking

Next I began feeding the meat through the grinder. With one hand holding the casing to prevent it from falling off and to meter the amount of meat, and the other hand plunging the meat, I began. After the initial inch of meat comes out, stop, pull the air out of the casing and tie off the end. As I continued I began to understand the negative reviews about the plastic pusher. When pushing the ground meat with the pusher, some of the meat begins to actually come up along the sides of the pusher instead of being pushed down which creates a seal. Then, when the pusher is extracted, because of this seal, it tends to create a suction which pulls the meat out from the grinder chamber. This in turn causes the introduction of air pockets into the sausage with the next insertion of the pusher. Not what you want! This created some frustration throughout the entire process.


I stopped several times to remove the stuffer to clean out the blade from the build up of sinew.  It took a while but I developed a rhythm and feel for the whole process. One of the challenges is to control the thickness of the sausage which is exasperated with the formation of air bubbles. When I was finished, I had used only a small portion of the casings (maybe 20%). 


After the casing was filled, I went through and tried to even the thickness of the link and was a bit aggressive with my handling. I tore the casing as you can see above. Not a big deal. I just performed a tubal ligation and removed the damaged section. Next, I just sectioned the links by pinching and twisting.


Finished Product

I would say that the entire process took me about 5 hours. That includes stopping to take pictures and having to clean up each time for the shot. It was a lot of effort for something that's readily available at my butchers; however, it's always nice to know how something is made. I think now that I have seen the process, I will be more efficient the next time. I plan to call Kitchen aid to see how I can get a wooden plunger to solve the air bubble problem.

POSTSCRIPT:
After spending a great deal of time and energy making the sausages today I was wondering if the effort was really worth it. Tonight I grilled some of the sausage for dinner. It was DELICIOUS! It was better than any store-bought sausage. The flavors were great, the texture was nice, and it had nice heat. Any doubts I had about whether the effort to make sausage at home is worthwhile have been removed.

Things I would do differently:

-Try to get a wooden pusher from ebay. The plastic pusher is a cheap and ineffective tool.
-As good as the sausage was, I think I would use more fat the next time. It tended to be a little dry when I cooked it. I will use 1 Lb. of pork fat with 5 Lbs. of pork shoulder the next time.
-I did not cut out and remove the sinew when I initially cut the meat into bite sized pieces. This caused the grinder blade and die to become clogged.
-I will use an ice bath to house the meat while working on it to keep it even colder so that it grinds more easily
-I will place a pan or sheet tray to catch the sausage as it come out of the grinder instead of doing it right on the counter top. You don't see it in my pictures because I cleaned before taking the pictures, but it was VERY messy to have the meat/fat/blood/casings all laying on the countertop as the sausage was being formed.
-There is a leverage problem when using the pusher because of the height of the grinder which is already well above the countertop level. Unless you're well over 6' tall, it's very awkward to push down on the pusher from that angle. So, maybe a foot stool would help.


Thursday, December 30, 2010

The Chinois

Have you ever wondered why creamy soups in a restaurant seem so much silkier than the soups you make at home? The secret behind that smooth silky texture is the humble chinois. A chinois, aka china cap, is a conical fine-meshed strainer which is a workhorse in the professional kitchen. It is used to strain stocks. All cream soups are passed through it, usually several times for extra refinement. Clam and mussel juices are "cleaned" by straining through the chinois. The egg mixture used to make pasta is passed through a chinois to remove any stray shells. All sauces are passed through a chinois. It's uses are infinite and restaurants employ the chinois to add that extra finesse to their dishes.


Prior to culinary school, I never had one, nor did I really see a need for it. Now it's an indispensable part of my kitchen. I use it every morning to strain my smoothie to create a luxurious texture. I was amazed to see the hundreds of berry seeds that were strained out the first time I used it. It's a must for home stock making. All my sauces are passed through it to remove chunks, impurities, and to create smooth delectable texture. They are not cheap. A good one will cost over $100, but with care it will last a lifetime. Make it a part of your kitchen, you won't regret it.


Thursday, December 23, 2010

Another Winery job?

I went in to the restaurant last night just for the prep. The garde manger cook, a relatively new guy. was a bit behind so my night was dedicated to helping him with his very lengthy mis en place. Although a junior position in the kitchen, I think garde manger may be one of the most challenging. He is responsible for the amuse bouche, the cold apps, salads, soups, bar food orders, and terrines. On busy nights, the station is manned by 2 but we're in the slow season, so the Chef keeps only one guy at the station on the week nights.

While cutting away at the prep station, I asked the Chef about his old job prior to the restaurant. He had been a winery Chef at a Sonoma Valley winery. As we spoke, he mentioned that his successor at his old winery job is one of his best friends and he would be happy to pass my info to him for working special events! Wow! Another winery job and working for another Chef would be great. I didn't respond immediately because I don't want to bite off more than I can chew, but I also couldn't let such a generous recommendation slip by. So, I said "yes". This does not mean that his friend will want me or even need more people, but I was flattered that the Chef saw me worthy enough to recommend. This profession is truly incestuous with an extensive spider web of connections between the Chefs which is another reason to always do your best, present a good attitude, and refrain from burning any bridges because It could come back to haunt you or as in this case, it could reward you.

Wednesday, December 22, 2010

Kangsuh Restaurant, NYC (Allis LCB classmate)

In the continuing tradition of keeping in touch with some of my LCB classmates, I was fortunate enough to meet with my classmate Allis in NY for lunch. I was lucky enough to catch Allis while she is home for the Holidays from Tokyo. we had also invited Julia but she was unable to attend due to travel plans. We decided to meet in Koreatown which is along 32nd St between 5th Avenue and Broadway. The street is lined with lots of Korean restaurants which makes it difficult to choose one from another. We decided on Kangsuh Restaurant. I deferred all of the ordering to Allis who is of Korean heritage. My only request was that we include the traditional Korean BBQ in the order. Allis ordered salads, assortment of vegetables marinated in various sauces, and dumpling soup. The table top stove was gas and not the traditional charcoal which Allis pointed out would have been better for flavoring the meats with that great smoky flavor. The meal was tasty and the service was good, but I have to confess we were too busy catching up to focus on the food. Although her job keeps her very busy, Allis has managed to squeeze in a part-time internship at a Tokyo restaurant to keep her cooking hand in the game. She provided me a small glimpse of what it's like behind the scenes of a Japanese kitchen. It's fascinating to see where we have all landed following our Parisian experience. Obviously driven by the passion for food, we have all managed to find our niche, whether full-time or part-time, despite primary careers and personal demands.

I dug up the above picture of Allis which was taken a year ago during a class party following our final written exam. Every time I talk with one of my classmates I think how much fun It would be to go back for Intermediates!

Sunday, December 19, 2010

Winery Event (I am unshackled)!!

The Chef had asked that I come in to the winery for 2 days to work a special event. A family had hired the winery to host their family reunion for approximately 110 people. The Chef called in his team of chefs to prep on Thursday and work the event on Friday. I was assigned to prep and execute the 3 appetizers as well as cook the family meal both days. The three apps were dungeness crabs & mussels arancini served with crème fraiche and salmon roe, duck leg carnitas, and garlic bruschetta with broccoli raab & fried quail egg. Chef had laid it all out in a detailed list of assigned mis en place, and a time charted blow-by-blow execution for the event day. He had also assigned 2 of the cooks to help me with the final execution of the appetizers at service time. In all, there would be 6 of us there (including Chef) to execute the event. It was nice to meet a few new faces. It didn't take long for everyone to feel their peers out for their depth of experience, background, and jobs. I love the cooking profession for its honesty. It's quite difficult to pretend to be anything above your actual talent level because it will show immediately. So, I made no bones about being a complete novice.

Thursday was a cinch. Only 3 of us were tasked to come in for the pre-event prep day. Prepping was simple with the basic cutting of vegetables, shredding duck confit, blanching/shocking some ingredients, roasting garlic, essentially creating "kits" for each appetizer, and cooking the family meal. I made a pasta meal for the family meal with sauce that was already in the walk-in, threw in some herbs, charcuterie meats and served with bread. It was a sunny day, the kitchen door was open allowing the vineyard view to spill into the kitchen. We chit chatted as we prepped. I tried to conceal the whole airline pilot thing, but inevitably it becomes obvious that since I only cook someplace else 1 day per week as an intern I am either a trust fund baby, or I have another job. So a flurry of questions ensued about how and why. I steered it back to the cooking. It was a fun relaxing day. I dropped my guard and allowed myself to be completely complacent. My soft underbelly was exposed and I was a prime candidate for a sucker punch. I went home feeling confident and was ready to do battle the following day.

Friday proved to be a cold rainy day as I made my way over to Napa valley. I felt prepared, having reviewed my list of tasks for the day. I wasted no time as I jumped right in to my final prep and began checking items off my list. I took a glimpse at one of the experienced cook's list and I was really impressed that she could actually pull off such a comprehensive list. The Chef came over and said "Mark, the appetizers are where things always fall apart. Getting 3 hot apps out simultaneously for 110 people will be tough. Do your best". My thoughts were "he must know something that I don't know, because I am ahead". I looked at my list again and felt good. I grabbed some serving platters and staged the plating area for the apps. I went to the garden and hand picked some garnish herbs for the serving platters. I whipped some crème fraiche and folded in the salmon roe and some chives and salt. The list was looking good. I looked at the clock and realized that I had 30 minutes to cook the family meal. Once again, it was a simple plan using mostly things that were already in the walk-in. After knocking that out, I got back to my list. With only an 1.5 hrs to go, It was time to attack the items that needed to be cooked and held in the warming cabinet. It was here that the plan began to unravel. First on the list was pan toasting 125 bruschetta. The Chef specifically wanted them pan roasted and not oven baked which would have been much faster. "Toasted on one side and lightly toasted one the other with a slightly soft middle" were his exact instructions. I began using 2 large teflon pans for the job, but it was taking way too long. I switched over to the flat top. For some reason the flat top wasn't getting hot enough and this was where I fell way behind..I still needed to spread the bruschetta with the roasted garlic, fry 110 quail eggs and ring mold cut each one, fry the shredded duck confit, etc... The weeds were rising all around me...SHIT! I had chosen to skip eating the family meal to stay ahead and now I was falling behind.  As everyone else returned from family meal it was like the cavalry riding in with reinforcements. Sweat on my forehead and what must have been a look of panic on my face must have given me away. George jumped on the quail eggs, Abby spread the garlic, etc..it was crunch time and the kitchen was in full motion. The next 30 minutes were a complete blur but somehow we managed to crank out all three hot apps, plate, and get them out. The Chef came over and with a smirk on his face said "what did I tell you, it always happens". My specific job for the night was done, I was now the extra hand to help with the remainder of service just as everyone had helped me with the apps.

The kitchen was completely cleaned and dismantled and retooled for the next course. This was the pumpkin risotto and pancetta with salad and a kids pizza plate. The chef quickly assigned stations for the plating, demoed one plate, and once again we cranked out 100 plates. Even the dishwashers were brought in for the plating. It was an assembly line. Again, the stations were wiped down and reconfigured for the main entrees. A halibut mounted on braised gigante beans and mussels surrounded by chanterelle broth or a roasted NY Strip and braised shoulder served with a wild mushroom confit and vegetables. Again the chef demoed, and we all plated and cranked them out. The scene was replayed with cheese plates and the dessert. And just as quickly as it started, it was over. Throughout the night guests came in late and wanted a course that had already been served. I was the guy who was in charge of making the straggler plates. Also, each of the above dishes had a vegetarian version. I was also the veg. guy who made all of those dishes.

It was a blur of a night. The 4 hours of service evaporated like it was 10 minutes. The Chef allowed a free- for-all run of some of the food that was left in the kitchen. Honestly, I didn't have much of an appetite. Chef told me to get out of there because I had started a little earlier than some others. I thanked him, shook hands with everyone and headed out to the cool drizzly night. Phewww. I didn't know how to feel. Had I done a good job? Is it always this crazy? I had mixed emotions about my performance. It was a huge learning experience. Where as my internship Chef gives me very little latitude, the winery Chef expects me to just run with it. It's a nice but difficult transition from restraint to freedom.

Tuesday, December 14, 2010

What's in your fridge? (Recipes for Creme fraiche, lemon confit, & Garlic confit)

I had a magazine subscription to Bon Appetit for many years and one of the my favorite sections of that magazine was when a celebrity or a chef was asked what they had in their fridge. It provided a voyeuristic glimpse into the private food psyche and habits of that person. Most people have certain "go to" items always at hand. I have three such items that are always present on the shelves of my fridge. All three are universally used in almost everything I prepare in my kitchen. A picture in my last post gave away my 3 secrets. Here is a glimpse into the dark corners of my fridge.

Creme fraiche is nothing more than a sour cream with a higher fat content. It's often difficult to find in a store and mostly unfamiliar to novice cooks in the U.S. It is incredibly easy to make at home and has a few advantages over its cousin the sour cream. It is silky and luxurious, it does not curdle when heated (as sour cream), and it can be adapted for both sweet and savory dishes. It's a beautiful addition for sauces, it's a great accompaniment for potatoes, creamy soups, etc..When whipped with sugar or any syrup or honey, it serves as a heavenly topping for almost any dessert. I use a spoon full in my morning smoothie to give it a silky texture and to add flavor. Its uses are boundless. Here is how you make it:

Ingredients:

1 cup of whole cream
1 TBS butter milk

Mix the 2 ingredients and stir well, place in a glass or a bowl and cover with saran. Leave at room temperature for 24 hours. Then stir well and place in the fridge. It will keep for approximately 10 days.


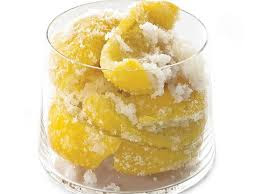
Lemon confit are lemons that are cured in salt. The addition of citrus (acid) in food is necessary to balance flavors, but sometimes its use can be overpowering. How can the cook add that acidity in a such a subtle way that it's almost unrecognizable? This is where the lemon confit comes in to steal the show. By curing the lemon, it's juices are "pulled out" leaving the essence of the lemon flavors. What we're after here is not in the fleshy part of the lemon but the flavors in the rind. Once properly removed and cut, the lemon zest can be used in almost any dish to add a fresh subtle acidity. Add it to risotto, include in a salad dressing, incorporate in a pasta dish, add to mashed potatoes, add to a sauce, etc...It will bring a fresh very subtle lemon zest flavor to your dish.


Ingredients:


6 lemons
1-2 cups kosher salt
1 or 2 quart canning jar(s)


-Wash the canning jar, lid and gasket in boiling water to sterilize. Dry the inside.
-Dip the lemons in hot water to remove the wax and wipe dry
-Cut the tip off one end of each lemon. cut each lemon in quarters along its length without cutting all the way through so that it's still in one piece with 4 petals
-Hold the lemon and pour salt into it to fill it with salt.
-place the lemon in the jar with the petal opening up, and add enough salt to fill and cover it, then place another lemon(s) on top of that and cover with salt. Continue until you have used all the lemons and cover completely with salt.
-Place in the fridge and store. It's best to store at least a month before using. It will keep a year.


When needed, retrieve a lemon or just 1 petal of the lemon. rinse with water and cut off all the flesh. Then carefully cut off ALL of the white pulp from the skin leaving just the rind. Cut into a very small pieces and place in a small bowl. Bring some water to boil and pour over the bowl of cur rind and steep for 30 seconds (this removes all of the very strong salty flavor). Strain the zest and use as needed.


Garlic Confit. The term confit means something marinating or immersed in something else. In this case, the garlic sits in oil, hence garlic confit. Garlic can be incorporated in almost any dish to add that wonderful flavor; however, for some the flavor may be too aggressive. That is were the garlic confit shines. By cooking the garlic in oil, the assertiveness of its flavor is diminished and replaced with a subtle, sometimes unrecognizable delicate flavor. Also, since it's cooked, the garlic is now soft which allows it to meld with the food and disappear so there is no crunchy garlic remnants in the food. It can be used as a spread, it can be whisked into a vinaigrette, use to finish sauces, etc...Furthermore, once the garlic is all used, the remaining garlic infused oil can now be used for cooking or dressing to add that garlic flavor. Here is how you can make it:

Ingredients:

Several heads of garlic (approximately 40 cloves)
1 - 2 cups of a neutral oil like peanut or grape seed oil

-Peel the skin off the cloves of approximately 40 cloves and place in a small sauce pan
-cover with the oil (insure that all the cloves are covered)
-heat on med heat,  adjust the temperature to achieve very small bubbles in the oil, you do not want to boil the oil
-cook until a knife can be easily inserted through the cloves. Approximately 30-40 minutes.
-remove from heat and cool to room temperature
-place in a container to keep all the cloves covered with the oil and store in the fridge. I keep mine for up to 2 months.


So, what's in your fridge?

Saturday, November 20, 2010

Organization in the kitchen

I have been called a few things when it comes to my need to organize, plan, clean, etc...you can guess them all. However irritating my neatness needs may be to my loved ones, they do come in handy in the kitchen world. In fact, a lot of organizational habits and methods used in the professional kitchen are easily transferable to the home kitchen. I have a very basic kitchen in my home. I don't have granite counters, exotic appliances (except my espresso maker), not much counter space, not even a gas stove. Of course those things would be nice, but I get by and have even come to love my kitchen by optimizing what I do have. Here are a few tips for transforming your kitchen habits to that of a professional Chef and those of a professional kitchen.


I organize my food much the same way as a professional kitchen. I tag everything I prepare for future use with a label and expiration date. Whether it's my garlic confit or creme fraiche stored in the fridge, or my stocks which I store in the freezer. Tagging removes all doubts about freshness of foods hidden in the dark corners of your fridge/freezer.

Along with above, wouldn't it be really nice to have a list of things in your freezer? Or, a visual plan on what may be on your menu later in the week? I bought a status board much like what you would see in any restaurant kitchen where I can jot down my food ideas. Trust me when I say that we all have that latent  childhood desire to write and erase on the chalkboard. I keep a list of my freezer contents to help me with meal ideas. It's so nice to know what I have in there at a glance when I am brainstorming about meal ideas. Additionally, I use the board to write down dishes that I would like to make in the future as ideas come to me. I also use the board to list upcoming dishes for events, dinners, etc...I love it!

A professional kitchen has work stations for performing different tasks. I have created stations in my kitchen to mimic the restaurant kitchen on a micro level. Of course, space is a factor here. I have a prep station next to the sink, a pasta making station (that I break down when not in use), a coffee making station, a dough working area, etc...It really helps with efficiency and speed to develop a habit of performing tasks in the same location.

Recently I decided that I hate constantly digging in and out of cupboards to retrieve and put away stuff. Maybe the restaurant has influenced me in this direction, but I find it a waste to time. I am not only talking about plates, but pans as well. So, I went out and bought an industrial storage rack to house most of my plates, serving dishes, pans, etc..Additionally I hung a pot rack so that ALL of my cookware, chinois, tammis, etc.. are within easy reach when I need them. What a difference in the functionality of my kitchen! Aesthetically this may not be for everyone or every kitchen, but if it is, I highly recommend it.


I used to be in the habit of pulling out the oils, vinegars, etc..as I needed them at the stove, but at some point I realized that it's much more desirable to have all of those things permanently next to the stove. So, I got a tray to store all of my oils, salts, and peppers. Along with this theme, I bought squirt bottles to allow for a more finessed application of a sauce, or liquid just as they do in a professional kitchen.

Finally, I am always looking for unique ways to organize. Recently I created this rig to hang my pasta instead of using precious counter space. I just put in 2 hooks in the ceiling and some string. It's easy to dismantle and re install as needed.

I hope some of these ideas have been helpful. Beth rolls her eyes with some of my kitchen organization ideas, but I don't think she has much complaint with the final product. Happy cooking!